Target Species
Snapper
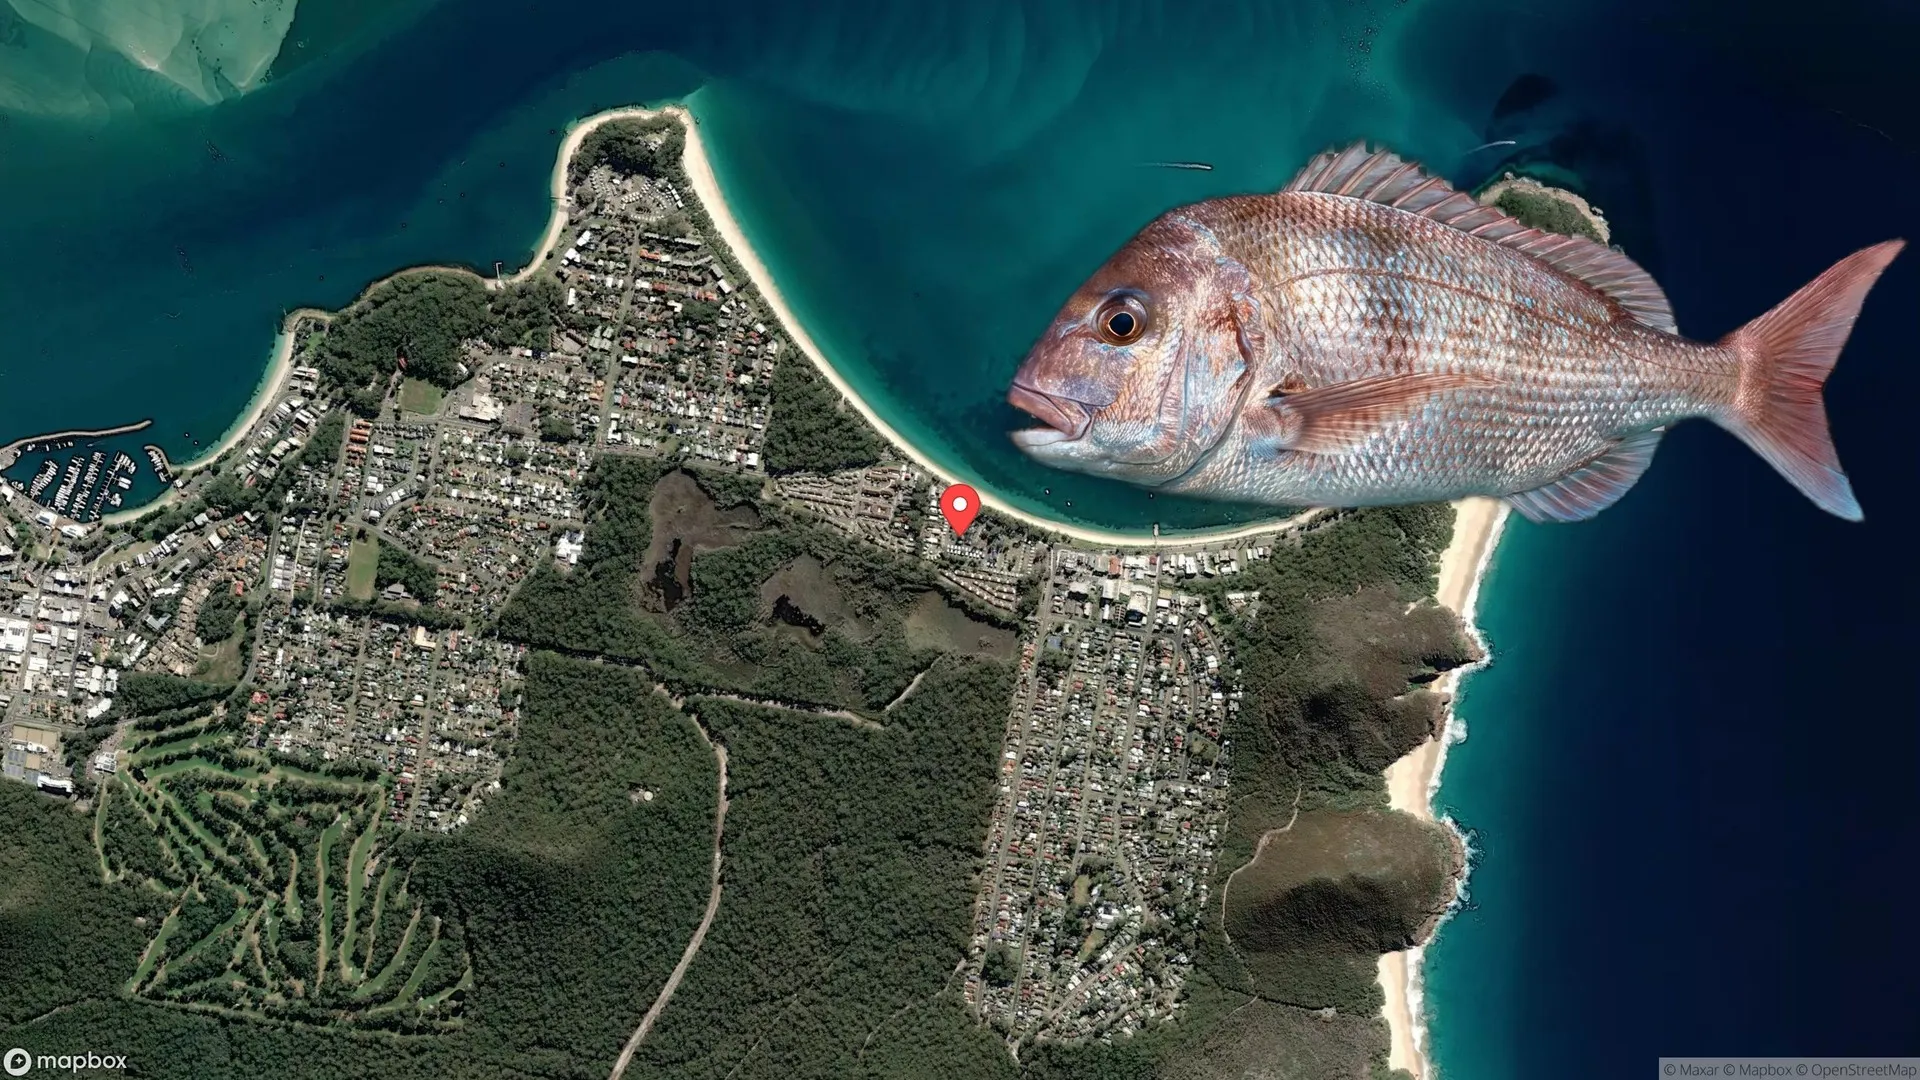
Shoal Bay is one of the top spots for Snapper fishing in NSW, offering easy access to shallow reefs and deep water drop-offs right at the mouth of Port Stephens. The area is known for producing big “Reds” in the wash zones around Tomaree Headland and the deeper gravel patches leading out to the open ocean.
For many New South Wales anglers, seeing the rugged Tomaree Headland rise above the clear waters of Shoal Bay means one thing: prime Snapper grounds. Sitting just inside the entrance of the vast Port Stephens estuary, Shoal Bay acts as a key transition zone where nutrient-rich estuarine water meets the clean, oxygenated flow of the Tasman Sea. This mix creates a feeding zone that’s legendary for targeting Chrysophrys auratus, better known as Snapper or “Reds.”
What sets this spot apart isn’t just the number of fish; it’s the range of terrain on offer. Whether you’re casting from the rocks or launching a boat from the local ramp, the bay gives you shallow kelp beds, bommies, and deeper gravel runs all in one run. Unlike offshore reefs that need a long ride, the best Snapper zones here start just a few hundred metres from shore. It’s a fishery where a 6kg Red can come from 8 metres of water in the wash or from 40 metres deep.
But Shoal Bay’s popularity means the fish are sharp. They see plenty of lures and baits, especially over holiday periods. Just dropping a line won’t cut it; you need to read the tides, know the structure, and stay stealthy to fool these wary old fish. In this guide, we’ll break down the real tactics locals use to consistently fill the bag, going past basics to cover the fine details of fishing this iconic bay. From the right leader strength to handle jagged reef, to the exact tide stage when the big ones bite, you’ll learn how to make your day on the water one to remember.
Getting There
Snapper
Chrysophrys auratus
Always check current NSW DPI regulations before fishing. Bag and size limits may change.
Understanding Shoal Bay: Location Intelligence
To keep hooking Snapper at Shoal Bay, look past the scenic views and get to know the complex underwater layout that shapes this spot. It’s not just flat sand; it’s a shifting zone driven by the strong tidal flow through Port Stephens. The land here funnels huge volumes of water between Tomaree and Yacaaba Headlands. This flow scours the bottom, exposing the hard structure Snapper love, and forms pressure waves that bunch up baitfish.
Location Essentials
The Bathymetry of the Bay
The seafloor at Shoal Bay splits into three main zones, each needing a different game plan.
1. The Shallows and Wash Zone (5m - 12m) Near the headlands and rocky edges, you’ll find wide shallow reefs thick with kelp and cunjevoi. This is wash fishing country. The water here is often rough, charged with oxygen from waves smashing the rocks. Big Snapper move through these shallows, especially in low light or choppy water, hunting crabs, urchins, and baitfish knocked loose by the surge. The bottom is tough—sharp rock and heavy weed—but this is where some of the biggest fish are landed. Watch for the “drop-off” where the reef shelf ends and meets sand or gravel. Snapper cruise this edge like a main road.
2. The Gravel Patches (15m - 25m) As you head out from shore toward the middle of the entrance, the bottom shifts. You’ll find broken ground, gravel, and shell grit. This is classic Snapper feeding ground. Unlike the ambush style in the shallows, fish here are often on the move or in schools. These zones snag less, but you need to manage your drift well. A good sounder is key; you’re not after big pinnacles, but small rises, changes in bottom hardness, or signs of bait sitting near the bottom.
3. The Deep Drop-offs (30m+) As you near the heads and beyond, the depth drops fast. The current here can be strong. In these deeper zones, look for lone bommies or big ledges that break the flow. Snapper sit in the slack water behind these, waiting for food to drift past. This area often fires in the middle of the day when the sun pushes fish deeper, or in warmer months when the shallows get too hot.
The Current Factor
The biggest factor at Shoal Bay is the current. The tide moving in and out of Port Stephens is powerful.
- The Run-Out Tide: This is often best for the inner parts of the bay. As water drains from the port, it carries warm, nutrient-rich water and baitfish out to sea. This forms a “food conveyor belt” that Snapper line up to feed on. The water often gets murkier on the run-out, which can make fish less cautious and more likely to bite.
- The Run-In Tide: While the water is clearer, bringing in clean ocean water, the run-in tide can push fish tighter to structure. The force of the incoming tide against the headlands creates back-eddies and pressure zones. Finding these calm spots in the heavy flow is the key to hooking up when the tide is running hard.
Structure Orientation
Snapper in Shoal Bay use structure but don’t always stay glued to it. They’ll move out onto sand near the reef to feed. A common error is anchoring right on the high reef. A smarter move is to anchor or drift beside the structure, casting your bait or lure back toward the reef edge. This pulls the fish out from cover and gives you a better shot at landing them before they cut you on the rocks.
Bait presence is the final clue. If your sounder shows empty ground with no bait schools (yakkas or slimy mackerel), the Snapper probably aren’t there either. Look for the “fuzz” on your screen that shows life. Where there’s bait, the predators won’t be far behind.
For those keen to compare this style of structure fishing with other spots, our guide on Pink Snapper at North Mole offers a solid contrast between harbour rock wall fishing and the open bay reef fishing found here at Shoal Bay.
When Is the Best Time to Fish for Snapper at Shoal Bay?
The most productive times to target Snapper at Shoal Bay are during the low-light periods of dawn and dusk, especially when these line up with a tide change. The first two hours of the run-out tide are particularly effective as baitfish get swept out of the estuary, sparking aggressive feeding from Snapper holding on the reef edges.
Timing is everything in the fast-flowing waters of Port Stephens. Unlike offshore grounds where fish might chew all day in deep water, the shallow nature of Shoal Bay means the fish are heavily influenced by light levels and tidal flow. If you show up at midday with the sun high and the water crystal clear, you’re likely in for a tough session. To consistently land quality fish, you need to match your efforts with the rhythms of the environment.
The Magic Hours: Dawn and Dusk
Snapper are naturally photophobic in shallow water. They feel exposed to predators when the sun is high. As a result, the transition periods of dawn and dusk are the undisputed peak times.
- The Morning Bite: Aim to be anchored and burleying at least 45 minutes before sunrise. The “grey light” period often produces the biggest fish of the day. As the sun clears the horizon, the bite can shut down fast, especially in water shallower than 15 metres.
- The Evening Session: Conversely, the hour before sunset and the hour just after are prime times. As shadows stretch out from Tomaree Headland, Snapper will move from the deeper gravel patches up onto the shallow reef edges to hunt.
Tidal Influence
The tide at Shoal Bay is strong. At the peak of the run, the current can be hard to fish, making it tough to get your bait to the bottom naturally.
- The Change of Tide: The period of “slack water” (about 45 minutes either side of the high or low tide) is golden. The current eases, letting you present baits naturally without heavy lead. This is often when the cautious, trophy-sized fish will feed.
- Run-Out vs. Run-In: While fish can be caught on both, the run-out tide is generally preferred by locals. The outgoing water carries scent (burley) further and flushes prawns, crabs, and small baitfish out of the port. The slightly murkier water of the run-out also gives the fish more cover.
Seasonal Patterns
While Snapper are a year-round option, their behaviour shifts with the seasons.
- Winter (June - August): The cuttlefish run happens in winter. Big Snapper feast on dying cuttlefish. This is the time for big baits and big fish, though the numbers might be lower.
- Spring & Autumn: These are the peak seasons for numbers. The water temperature is ideal (18°C - 21°C), and schools of pan-sized fish (35cm - 50cm) are aggressive.
- Summer: The shallows can be rough due to boat traffic and warm water. Fishing deeper (30m+) or strictly at night is the best bet.
Snapper Seasonal Calendar
Tide Times
Optimal Tide
Run-out tide, specifically the first 2 hours after high tide.
Tide movement is critical for fish activity. Most species feed actively during tide changes, especially the run-in (incoming) tide.
Detailed hourly tide charts
Official tide predictions
7-day tide calendar
Tide Guide
Best for most species. Fish move in to feed as water rises.
Good for ambush predators. Baitfish get swept out.
Slower bite. Fish less active during slack water.
New/full moon. Bigger tidal range, more fish movement.
Moon Phase & Solunar
Moon phases influence fish feeding behavior. New and full moons create spring tides with stronger currents and increased fish activity.
Best Phases
- New Moon: Peak feeding activity, spring tides, excellent fishing
- Full Moon: Strong tides, night feeding, great for nocturnal species
- 3 Days Either Side: Extended peak period for maximum results
Major/Minor Periods
- Major Periods: Moon overhead/underfoot (2-3 hours)
- Minor Periods: Moon rise/set (1-2 hours)
- Best Times: Major period + dawn/dusk = explosive action
Weather Conditions
Check current conditions before heading out. Wind, swell, and barometric pressure significantly affect fish behavior.
Official forecasts, warnings & radar
Hourly wind speed & direction
Swell height, period & direction
Barometer Basics
Keep an eye on the barometer. A rising barometer (above 1015 hPa) often triggers a hot bite for Snapper. Conversely, a rapid drop usually shuts them down. If a storm is approaching, fish the window before the front hits—the pressure drop often sends them into a feeding frenzy before they hunker down.
What Tackle Do You Need for Snapper at Shoal Bay?
The ideal tackle for Shoal Bay Snapper is a 7-foot, 5-8kg spin rod paired with a 4000-size reel loaded with 20lb braid. This “float lining” setup offers the perfect balance of sensitivity for detecting subtle bites and enough power to turn a hard-fighting fish away from the sharp reef structure.
Choosing the right gear for Shoal Bay is a balancing act. You need finesse to fool fish in clear, shallow water, but you also need stopping power. The terrain here is unforgiving; a hooked Snapper will instinctively head for the sharpest rock or kelp bed available. If your gear is too heavy, you won’t get the bite. If it’s too light, you’ll get the bite but lose the fish.
The Rod and Reel
For the vast majority of bait fishing and soft plastic work in the bay, a spin setup works better than overhead gear. It allows for longer casts (getting the bait away from the boat shadow) and handles light weights more easily.
- Rod: Look for a 7ft to 7ft 6in graphite rod rated 4-7kg or 5-8kg. You want a rod with a soft tip (fast action) to pick up the “inquiry” bite without the fish feeling resistance, but a strong butt section to lift the fish once hooked.
- Reel: A 3000 to 4000 size spinning reel is the sweet spot. A smooth drag is essential. Snapper make blistering initial runs, and a sticky drag will result in a popped leader every time. “Baitrunner” or “Live Liner” style reels work great for bait fishing, letting the fish run with the bait before you engage the drag.
Line and Leader
This is where the battle is won or lost.
- Main Line: Braided line (PE) is a must. It has zero stretch, meaning you feel every tap, and its thin diameter cuts through the Shoal Bay current better than monofilament. 15lb to 20lb braid is standard.
- Leader: You must use Fluorocarbon. It’s invisible underwater and, more importantly, stands up better to abrasion than mono. In the shallow wash of Shoal Bay, use 20lb leader. If you’re getting busted off, step up to 30lb, but keep in mind that bite rate may drop. A long leader (two rod lengths) is recommended to keep the visible braid well away from the bait.
For a deeper dive into selecting the right gear, check out our tackle basics guide.
Complete Tackle Specifications
| Component | Specification |
|---|---|
| Rod | 7ft - 7ft 6in Graphite Spin, 5-8kg rating |
| Reel | 4000 size spin reel (Baitrunner optional) |
| Main Line | 15-20lb high-quality PE Braid |
| Leader | 20-30lb Fluorocarbon (min 2 rod lengths) |
| Hooks (Bait) | 5/0 - 6/0 Suicides or 6/0 Circle Hooks |
| Hooks (Lure) | 1/4oz - 1/2oz Jigheads, 3/0 - 5/0 hook size |
| Sinker | Size 0-4 Ball Sinkers (conditions dependent) |
| Swivels | Size 10-12 small black barrel swivels (or connect leader via FG knot) |
How Do You Rig for Snapper?
The most effective rig for Snapper at Shoal Bay is the “Strayline” or “Floatline” rig, which uses a snelled two-hook setup with a small running sinker sitting right above the hooks. This lets the bait drift naturally down the water column, mimicking a dying fish or prawn — a key trick for fooling cautious Snapper.
Rigging for Snapper is all about natural presentation. Snapper are grazers and scavengers; they often pick up a bait, mouth it, and swim off before committing. If they feel the weight of a fixed sinker or the tug of a tight line, they’ll drop it straight away.
The Strayline Rig (The Local Favourite)
This rig is built to present a whole pilchard or squid strip as naturally as possible. The trick is using the lightest sinker that still gets your bait down. You want it to waft down, not crash like a stone.
Why it works:
In Shoal Bay’s current, a heavy sinker pins the bait to the bottom while the line curves unnaturally. A strayline rig moves with the flow, just like the burley you’re tossing in.
Building the Perfect Strayline Rig
- 1
Select Leader Material
Cut a 1.5m to 2m length of 20-30lb fluorocarbon leader. Do not use wire or heavy mono.
- 2
Snell the Bottom Hook
Thread the end of the leader through the eye of a 5/0 suicide hook. Tie a snell knot around the shank to secure the hook. This is the bottom hook.
- 3
Add the Keeper Hook
Slide a second 5/0 hook down the leader until it sits about 10-15cm above the bottom hook. Snell this hook in place. This two-hook rig holds a whole pilchard perfectly.
- 4
Add the Sinker
Thread a small ball sinker (size 0-2) onto the leader so it sits directly on top of the top hook (the keeper hook). This is crucial—having the weight right at the bait allows for a more natural wafting descent than having the weight up the line.
- 5
Connect to Main Line
Tie a small black barrel swivel to the other end of the leader, or for a stealthier presentation, use an FG knot to connect the leader directly to your braid main line.
- 6
Bait Up
Thread the bottom hook through the tail of the pilchard and the top hook through the eye or shoulder. Ensure the bait hangs straight.
- 7
Test the Rig
Drop it in the water next to the boat. It should sink horizontally or head-down slightly, looking like a dying fish.
What Bait Works Best for Snapper?
The top bait for Snapper at Shoal Bay is a fresh, whole Western Australian Pilchard. Their oil content and silver flash drive Reds wild. But when small “pickers” tear up soft baits, fresh local squid or cuttlefish strips are better — they hold up longer and still get bites.
While lures and soft plastics are popular, bait fishing remains the go-to for Snapper in Port Stephens, especially for those new to the run. Freshness wins every time. A pilchard thawed and refrozen turns mushy and loses its scent trail. Always grab the best bait you can find, or catch your own.
The “Big Three” Baits
- WA Pilchards: The gold standard. They bleed oil and scales steadily. Use them whole on a two-hook gang or snelled rig.
- Squid/Cuttlefish: Fresh is best. If you can scoop a squid over the kelp beds in Shoal Bay before your session, you’ve got the edge. Use the head whole for a trophy fish, or slice the tube into candle-shaped strips.
- Yellowtail Scad (Yakkas): These hang around the bay in numbers. Use them live under a balloon for a monster Snapper, or fillet them for tough, bloody bait that lasts.
For more details on preparing these baits, check out our full bait guide.
Bait Performance Analysis
| Whole Pilchard | Fresh Squid Strip | Live Yakka | |
|---|---|---|---|
| Effectiveness Rating | 5/5 (Excellent) | 4/5 (Very Good) | 4/5 (Big Fish Only) |
| Durability on Hook | 2/5 (Soft) | 5/5 (Tough) | 5/5 (Excellent) |
| Scent Dispersion | 5/5 (High Oil) | 3/5 (Moderate) | 4/5 (Vibrations) |
| Availability | High (Tackle Shops) | Medium (Catch your own) | High (Bait grounds) |
| Best Use Conditions | Low current, low picker activity | High pickers, fast current | Targeting trophy fish only |
The Cuttlefish Run Secret
In winter, big Cuttlefish move into Port Stephens to spawn and die. At this time, a fresh cuttlefish head is possibly the best Snapper bait on the planet. Spot one floating? Net it quick. The Snapper are keyed in and may ignore everything else.
How Do You Catch Snapper at Shoal Bay?
The most effective way to catch Snapper at Shoal Bay is “float lining.” This means casting your lightly weighted bait well up-current and letting out line so the bait drifts naturally back toward the reef. Keep light tension on the line without creating drag, waiting for it to speed up or “tick” when a fish takes it.
Catching Snapper here is more than just dropping a line — it’s about working the drift. If you just drop your bait straight down (bottom bashing), you’ll hook plenty of Sergeant Baker and small wrasse, but the big Reds will stay clear. The aim is to present your bait at a 45-degree angle or flatter, covering as much water as possible.
1. The Setup and Cast
Position your boat up-current of the reef you want to fish (use your GPS/Sounder). Once anchored or drifting, cast your bait as far as you can behind the boat, into the wash or toward the reef edge.
- The “Feed”: Right after the bait hits the water, open your bail arm (or disengage the reel). Let the line run freely.
- The Drift: As the current carries the bait, let it sink slowly. In strong flow, you might need to feed line out by hand so the bait isn’t pulled to the surface by line drag.
2. Bite Detection
Snapper bites can be unpredictable.
- The Smash: Sometimes, the rod will dip hard and line will scream off the reel. This often happens with bold fish in shallow water.
- The Run: You might see your line suddenly pick up speed on the surface while sinking. That means a fish has grabbed the bait on the way down and is moving off.
- The Knock: Big, cautious fish often just “tap-tap” the bait. Don’t strike yet. Wait for steady pressure on the rod tip or a clear pull.
- The Hookset: With circle hooks, don’t snap the rod. Just lift it firmly and start winding — the hook will set in the corner of the jaw. For J-hooks (suicides), strike hard once you feel the weight of the fish.
3. The Fight
Shoal Bay Snapper are gritty fighters. As soon as they’re hooked, they’ll make for the kelp or sharp barnacles on the rocks.
- Go Hard Early: Put strong pressure on in the first 10 seconds to turn the fish’s head. Give them space and they’ll bury you in the weeds.
- Rod Angle: Keep your rod tip high to keep the line above the reef edge.
- Patience at the Boat: Once the fish is off the bottom, ease the drag a little. Big Snapper often make one last run when they see the boat. Many are lost at the net because the drag was too tight.
4. The Secret Weapon: Burley
You won’t catch Snapper consistently at Shoal Bay without burley (chum). You need a steady trail of scent to draw fish from the reef to your boat.
- The Cube Trail: Chop old pilchards into small 1cm cubes. Toss a handful (3–5 cubes) every few minutes. The trick is consistency, not bulk. You want to excite them, not fill them up.
- The Stream: Your burley must flow the same way as your bait. If the current carries your burley one way and your bait another, you won’t get bites.
For more advanced strategies, see our guide on fishing techniques.
What Are the Rules for Fishing at Shoal Bay?
Shoal Bay falls under NSW Department of Primary Industries (DPI) rules. Recreational anglers must pay the NSW Recreational Fishing Fee (licence) unless exempt. General bag limits for Snapper usually apply, but always check the current size and possession limits via the official NSW DPI app or website before fishing.
Fishing in Port Stephens is tightly managed to protect fish stocks. It’s part of the Port Stephens-Great Lakes Marine Park, which means some zones restrict or ban fishing (Sanctuary Zones).
Key Regulations (NSW)
- Fishing Licence: You must carry a valid NSW recreational fishing fee receipt (digital or paper) when fishing.
- Bag & Size Limits: Snapper have set size limits (usually 30cm minimum) and bag limits (often 10 per person, with a cap on how many can be over a certain size). Note: These rules change. Always check the latest state regulations.
- Marine Park Zones: Watch for “Sanctuary Zones” (Pink Zones) where all fishing is banned. These include areas near Cabbage Tree Island and parts of the headlands. Use the “FishSmart NSW” app to check your GPS spot against these zones.
Conservation and Ethics
- Barotrauma: Snapper caught from depths over 10–15m can suffer from barotrauma (swollen swim bladder). If releasing, do it fast. Use a release weight to get them back down if they’re floating.
- Limit Your Catch: Just because you can take ten doesn’t mean you should. A couple of fish is enough for a feed. Large Snapper (70cm+) are top breeders and often have dry, tough flesh. Think about letting the big ones go and keeping the 40–50cm “pannies” for the table.
Critical Safety Considerations
1. The Tomaree Headland Wash: The rocks around the headland are extremely dangerous. Rogue waves can sweep anglers into the sea. Always wear a life jacket (PFD) when rock fishing, and never turn your back on the ocean.
2. Bar Crossing: If you head outside the heads, be very careful. The Port Stephens entrance can turn rough on a run-out tide with opposing swell.
3. Boat Traffic: Shoal Bay gets busy with jet skis, dolphin watch boats, and ferries. Always keep a sharp lookout and show correct navigation lights at night.
For more safety tips, read our rock fishing safety guide.
Your Questions About Snapper Fishing at Shoal Bay
What is the absolute best time of year to fish Shoal Bay?
The peak season for Snapper at Shoal Bay is generally from April to October. While you can catch them year-round, the cooler months (Autumn through Spring) are when the bigger fish move into the shallower waters of the bay. May and June are especially known for the "Red" run, where solid fish are regularly hooked up in the wash zones.
Is Shoal Bay suitable for beginner anglers?
Yes, Shoal Bay is an excellent spot for beginners because it offers productive fishing grounds that are protected from the open ocean swell. The inner sections of the bay have calm waters, ideal for getting your first bites. But new anglers should steer clear of the rough wash zones near the headlands until they're confident with boat handling. Hiring a local charter is a smart way to speed up your learning.
Do I need a boat to fish for Snapper at Shoal Bay?
No, you don't strictly need a boat. The rocky ledges around Tomaree Headland give land-based anglers access to deep water and the prime wash zones where big Reds hunt at first light. That said, a boat or kayak opens up the gravel patches and deep drop-offs (15-40m) out toward the entrance, where less-pressured schools of pan-sized fish hold.
Where are the best specific spots at Shoal Bay?
The standout marks are the kelp-edged wash zones along Tomaree Headland (5-12m), the broken ground and gravel patches in 15-25m toward the entrance, and the deep bommies and ledges near the heads (30m+). Land-based anglers do best off the headland rocks, while boat anglers should drift the reef edges and gravel on a moving tide.
What size Snapper can I expect at Shoal Bay?
Most Snapper landed at Shoal Bay are "pannies" between 35cm and 50cm, which are the best eating fish. Trophy "Reds" over 70cm are caught every season, and the bay occasionally produces giants past the magical 80cm mark, especially during the winter cuttlefish run when big fish move into the shallows to feed hard.
What is the best bait for Snapper at Shoal Bay?
Fresh whole WA pilchards on a snelled strayline rig are the number-one Snapper bait at Shoal Bay, thanks to their heavy oil content and natural flutter. When small pickers shred soft baits, switch to tougher fresh squid or cuttlefish strips. During the winter cuttlefish run, a fresh cuttlefish head is almost unbeatable for a trophy Red.
Is there parking available at Shoal Bay?
Yes, there is ample trailer and car parking at the Shoal Bay boat ramp, plus limited street parking near Tomaree Headland for land-based access. Parking fills fast over summer holidays and long weekends, so arriving before dawn not only secures a spot but also puts you on the water for the prime low-light bite.
Can I fish at night for Snapper at Shoal Bay?
Yes, night fishing can be excellent for Snapper at Shoal Bay, particularly on a warm, dark night over a run-out tide. Big Reds shed their daytime wariness after dark and push into the shallow wash zones to feed. Run a steady burley trail and fresh bait, and take extra care if rock fishing the headland — never fish those ledges at night alone.
Where can I buy bait near Shoal Bay?
You can buy bait and tackle at the local tackle shop in Shoal Bay and several stores in nearby Nelson Bay, only a few minutes' drive away. These shops stock fresh WA pilchards, squid, and current local knowledge on what's biting. For the freshest edge, jig your own squid over the kelp beds before your session.
What are the current bag and size limits for Snapper in NSW?
In NSW, Snapper currently have a minimum legal length of 30cm and a bag limit of 10 per person, with no more than 5 fish over 70cm. You must also carry a valid NSW Recreational Fishing Fee receipt. Limits and marine park sanctuary zones change, so always confirm the latest rules on the FishSmart NSW app before fishing.
Is Shoal Bay family-friendly for fishing?
Yes, Shoal Bay is very family-friendly. The calm, protected beach and inner bay are safe for kids to soak baits for whiting, bream, and flathead, and the foreshore has toilets, BBQs, and grassy picnic areas. Leave the rough headland wash zones — where the big Snapper live — to experienced anglers, and keep children well back from the rocks.
How crowded does Shoal Bay get?
Shoal Bay gets busy over summer holidays, Easter, and long weekends, with boat ramps, swimmers, and dolphin-watch tours all sharing the water. To dodge the crowds, fish weekdays or the dawn patrol window before the recreational traffic arrives — which also happens to be when the Snapper bite hardest.
Latest Fishing Reports
Stay updated with the latest catches, conditions, and hot tips from Shoal Bay. Check these sources for recent reports filtered by location and species.
Fishraider
Community fishing reports and catch logs
Fishing World
Professional fishing reports and news
Tackle World
Local tackle shop reports and tips
NSW DPI
Official recreational fishing reports
Fishingmonthly
Monthly fishing magazine and reports
Hooked Up
Video fishing reports and tips
Pro Tip: Filter Reports
When browsing reports, search for "Shoal Bay" or nearby landmarks. Look for reports from the last 7-14 days for the most relevant information. Pay attention to tide times, weather conditions, and successful techniques mentioned.
Share Your Catch
Caught something at Shoal Bay? Share your success with the community! Upload your catch photos and reports to help other anglers.
Disclaimer: Fishing regulations can change. Always verify current size limits, bag limits, the NSW Recreational Fishing Fee, and marine park sanctuary zones with NSW DPI (Fisheries) before fishing.
Ready to explore more? Check out our other fishing spots in the area, or learn about other species you might target in Port Stephens. New to chasing Reds? Our fishing basics guide is a great place to start.
Quick Info
- Location
- Shoal Bay
- Coordinates
- -32.7200, 152.1700
- Difficulty
- intermediate
- Target Species
- Snapper
Conditions
Check local weather and tide conditions before heading out.